
The Gmail Promotions tab leverages machine learning to place the most valuable messages at the top of your customers’ inboxes and includes visual aids in the form of Promotions that make your messages more recognizable and engaging. An additional benefit of optimizing emails for Gmail’s Promotions tab is that by having your emails stand out more, your customers will be more likely to open or click through on those emails, which could be a huge performance booster for Gmail customers.
Potential Promotions include expiration dates, coupon codes, image previews, deal badges and custom logos.
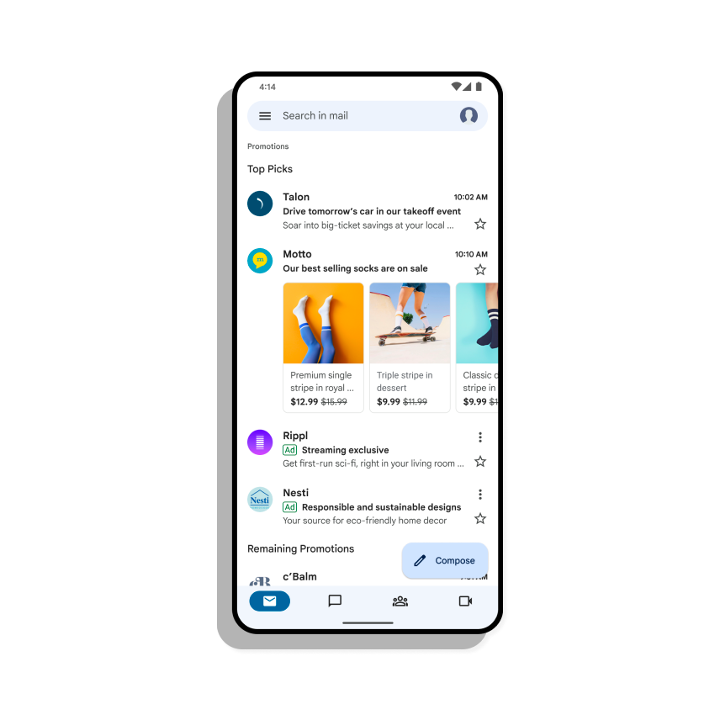
In this article we review all you need to know about how to optimize OptiMail emails for Gmail’s Promotions Tab.
Optimizing Emails with Annotations
Annotations allow you to highlight your email in the Promotions Tab and will only work in that tab. Annotating your email allows you to add information like images, your logo, promo codes, expiration dates on deals, and more. Annotations will be used to display your Promotions, helped by Google’s machine-learning algorithms.
Using Annotations in OptiMail’s Editors
Annotations can be added to your OptiMail templates using one of these two HTML options:
- Visual Editor - Optimove’s dedicated custom row
- HTML Editor - Adding JSON-LD code as a script tag in the heading of your email’s HTML
Visual Editor
- Search for "Gmail Promotions Tab" in the Row's search box.
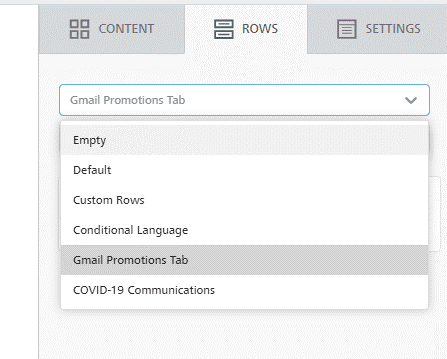
- Drag the row below the header of your email template.
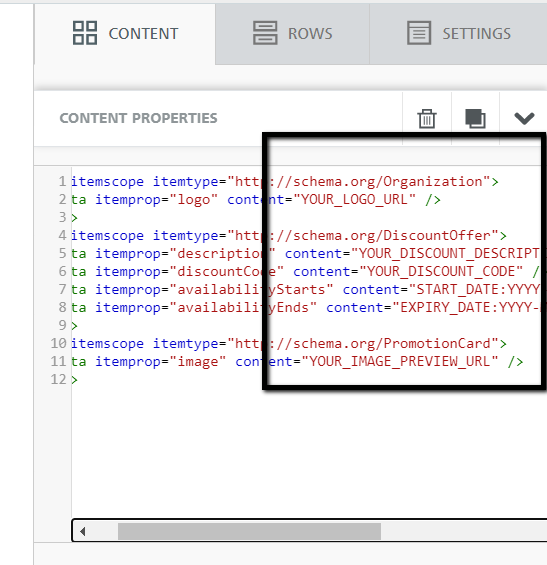
- Edit the relevant fields with the HTML code
- Save your email template
Please note:
Custom Rows for OptiMail templates are coming soon. Please contact your CSM to find out more or check out What’s New to keep an eye out for new features.
HTML Editor
- Copy and paste the Promo Tab HTML text seen below into an HTML content block
<div itemscope itemtype="http://schema.org/Organization">
  <meta itemprop="logo" content="YOUR_LOGO_URL" />
</div>
<div itemscope itemtype="http://schema.org/DiscountOffer">
  <meta itemprop="description" content="YOUR_DISCOUNT_DESCRIPTION" />
  <meta itemprop="discountCode" content="YOUR_DISCOUNT_CODE" />
  <meta itemprop="availabilityStarts" content="START_DATE:YYYY-MM-DDThh:mm:ssUTC_TIMEZONE:-0700" />
  <meta itemprop="availabilityEnds" content="EXPIRY_DATE:YYYY-MM-DDThh:mm:ssUTC_TIMEZONE:-0700" />
</div>
<div itemscope itemtype="http://schema.org/PromotionCard">
  <meta itemprop="image" content="YOUR_IMAGE_PREVIEW_URL" />
</div>
- Edit the appropriate fields specific to the template's promo or offer as per the above image.
- Save your email template
How to Create Gmail Promotions Tab Annotations
How to Create a Deal Annotation
Gmail Promotion Tab Deal annotations display text-based details about a promotion - inclusive of a promotion code or expiration date.
STEP 1: Add the Annotations
Copy and paste the relevant HTML (see below under Annotations HTML Content Blocks) into an HTML content block somewhere toward the top of the template. Please Note: This will be invisible when rendering the template for testing.
STEP 2: Update the Annotations
1. Update the URL after “logo” to the URL for the hosted image of your brand/company logo. This should be an HTTPS link.
2. Update the description of your promotion (what you see highlighted in green). This should be updated between the quotation marks after “description” content=
- a. Be specific, short, and sweet
- b. Don’t use run-on sentences.
- c. Consider using 4 words or less
3. Update the discount code for your promotion (what you see highlighted in grey) This should be updated between the quotation marks after “discountCode” content=
- a. Only use this space for a discount code
- b. Do not repurpose this space - it will always say “Code” before your text
4. Update the start and expiration date/time of your promotion
- a. Specify the time and time zone (find out more about formatting date and time here)
STEP 3: Test
1. Send yourself an email to a Gmail address once the annotation has been updated and appended to your email
2. NOTE: Annotations will only be rendered in Gmail’s mail app on mobile devices
3. If you do not see your annotations in the Promotions Tab, look at our Troubleshooting Guide.
How to Create a Logo + Single Image Only Annotation
Gmail Promotion Tab Annotation with only the brand logo and Featured Image to help increase visibility within the user’s Promotions tab.
STEP 1: Add the Annotations
Copy and paste the relevant HTML (see below under Annotations HTML Content Blocks) into an HTML content block somewhere toward the top of the template. Please Note: This will be invisible when rendering the template for testing.
STEP 2: Update the Annotations
1. Update the URL after “logo” to the URL for the hosted image of your brand/company logo. This should be an HTTPS link. This will update the small image to the left of your listing in the inbox in the Gmail in-app Mailbox only.
2. Update the featured image for the Promotion Card - the visual that renders horizontally below the email listing. Update the HTTPS URL after “image” content= between the quotation marks a. Supported image aspect ratios include 4:5, 1:1, 1.91:1
STEP 3: Test
1. Send yourself an email to a Gmail address once the annotation has been updated and appended to your email
2. Note: Annotations will only be rendered in Gmail’s mail app on mobile devices
3. If you do not see your annotations in the Promotions Tab, look at our Troubleshooting Guide.
How to Create a Single Image Preview Annotation
Gmail Promotion Tab Deal Annotation with a Featured Image annotation displays a visual rendering to help increase the propensity of your customers to engage with email. This includes a main image, the promotion code, and a brief description of your offer.
STEP 1: Add the Annotations
Copy and paste the relevant HTML (see below under Annotations HTML Content Blocks) into an HTML content block somewhere toward the top of the template. Please note: This will be invisible when rendering the template for testing.
STEP 2: Update the annotations
1. Update the URL after “logo” to the URL for the hosted image of your brand/company logo. This should be an HTTPS link. This will update the small image to the left of your listing in the inbox in the Gmail in-app Mailbox only.
2. Update the featured image for the Promotion Card - the visual that renders horizontally below the email listing. Update the HTTPS URL after “image” content= between the quotation marks a. Supported image aspect ratios include 4:5, 1:1, 1.91:1
3. Update the headline - the 1-2 lines that can appear below your featured product image. It is optional
4. Update the product price and price currency. Note, while both are optional, if updating the price, the currency MUST be a 3-letter currency code (i.e. USD, AUD, UAH, etc)
5. Update the discount value. This is also optional, however, if you have set a price in your annotation, you can set a discount value. When you set the original price in your annotation, Google will automatically render the updated discount price for you: If the original price is listed as $100 and you set the discount value as 25 (which is equivalent to 25%), then an adjusted price of $75 will appear.
6. Update the URL that will direct users to this particular product.
STEP 3: Test
1. Send yourself an email to a Gmail address once the annotation has been updated and appended to your email
2. Note: Annotations will only be rendered in Gmail’s mail app on mobile devices
3. If you do not see your annotations in the Promotions Tab, look at our Troubleshooting Guide.
How to Create an Image-Only Product Carousel Annotation
Gmail Promotion Tab Annotation with multiple product images. This type of annotation also includes a unique link per product so that customers can go directly to a product page and convert more immediately.
STEP 1: Add the Annotations
Copy and paste the relevant HTML (see below under Annotations HTML Content Blocks) into an HTML content block somewhere toward the top of the template. Please note: This will be invisible when rendering the template for testing.
STEP 2: Update the Annotations
1. Update the URL after “logo” to the URL for the hosted image of your brand/company logo. This should be an HTTPS link. This will update the small image to the left of your listing in the inbox in the Gmail in-app Mailbox only.
2. Update each image URL after the “image” content= and between the quotation marks. This needs to be an HTTPS url and lead to a hosted image for each unique product to be featured in the carousel.
3. Update the URL/link for each product you’re rendering in the carousel by updating the ‘url’ content= area - the area between the quotation marks
STEP 3: Test
1. Send yourself an email to a Gmail address once the annotation has been updated and appended to your email
2. Note: Annotations will only be rendered in Gmail’s mail app on mobile devices
3. If you do not see your annotations in the Promotions Tab, look at our Troubleshooting Guide.
How to Create a Full Product Carousel Annotation
Gmail Promotion Tab Annotation with multiple product images - featuring their unique pricing and a brief description per item. This type of annotation also includes a unique link per product so that customers can go directly to a product page and convert more immediately.
STEP 1: Add the Annotations
Copy and paste the relevant HTML (see below under Annotations HTML Content Blocks) into an HTML content block somewhere toward the top of the template. Please note: This will be invisible when rendering the template for testing.
STEP 2: Update the Annotations
1. Update the URL after “logo” to the URL for the hosted image of your brand/company logo. This should be an HTTPS link. This will update the small image to the left of your listing in the inbox in the Gmail in-app Mailbox only.
2. Update each image URL after the “image” content= and between the quotation marks. This needs to be an HTTPS url and lead to a hosted image for each unique product to be featured in the carousel.
3. Update the URL/link for each product you’re rendering in the carousel by updating the ‘url’ content= area - the area between the quotation marks.
4. Optional, you can update the headline for each product. This is the 1-2 lines that can appear below your products within the carousel, individually.
5. Update the product price and price currency. Note, while both are optional, if updating the price, the currency MUST be a 3-letter currency code (i.e. USD, AUD, UAH, etc)
6. Update the discount value. This is also optional, however, if you have set a price in your annotation, you can set a discount value. When you set the original price in your annotation, Google will automatically render the updated discount price for you: If the original price is listed as $100 and you set the discount value as 25 (which is equivalent to 25%), then an adjusted price of $75 will appear.
STEP 3: Test
1. Send yourself an email to a Gmail address once the annotation has been updated and appended to your email.
2. Note: Annotations will only be rendered in Gmail’s mail app on mobile devices.
3. If you do not see your annotations in the Promotions Tab, look at our Troubleshooting Guide.
Annotations HTML Content Blocks
How to Create a Deal Annotation
<div itemscope itemtype="http://schema.org/Organization">
    <meta itemprop="logo" content="https://other-editors.s3.amazonaws.com/images/00593/OptimoveHex.png" />
 </div>
<div itemscope itemtype="http://schema.org/DiscountOffer">
    <meta itemprop="description" content="20% off" />
    <meta itemprop="discountCode" content="20OFF" />
    <meta itemprop="availabilityStarts" content="2020-08-23T08:00:00-07:00" />
    <meta itemprop="availabilityEnds" content="2020-08-25T23:59:59-07:00" />
    </div>
How to Create a Logo + Single Image Only Annotation
<div itemscope itemtype="http://schema.org/Organization">
      <meta itemprop="logo" content="https://other-editors.s3.amazonaws.com/images/00593/OptimoveHex.png" />
    </div>
<div itemscope itemtype="http://schema.org/PromotionCard">
 <meta itemprop="image" content="https://other-editors.s3.amazonaws.com/images/00593/69616533_2925452614150702_9194308375414833152_o.jpg" />
    </div>
How to Create a Single Image Preview Annotation
<div itemscope itemtype="http://schema.org/Organization">
    <meta itemprop="logo" content="https://other-editors.s3.amazonaws.com/images/00593/OptimoveHex.png" />
    </div>
<div itemscope itemtype="http://schema.org/PromotionCard">
 <meta itemprop="image" content="https://other-editors.s3.amazonaws.com/images/00593/69616533_2925452614150702_9194308375414833152_o.jpg" />
 <meta itemprop="headline" content="UPDATE WITH 1-2 LINE PRODUCT DESCRIPTION" />
 <meta itemprop="price" content="UPDATE WITH OPTIONAL PRICE" />
 <meta itemprop="priceCurrency" content="USD" />
 <meta itemprop="discountValue" content="UPDATE WITH OPTIONAL DISCOUNT AMT" />
 <meta itemprop="url" content="PRODUCT URL" />
    </div>
How to Create an Image-Only Product Carousel Annotation
<div itemscope itemtype="http://schema.org/Organization">
      <meta itemprop="logo" content="https://other-editors.s3.amazonaws.com/images/00593/OptimoveHex.png" />
    </div>
<div itemscope itemtype="http://schema.org/PromotionCard">
 <meta itemprop="image" content="HTTPS IMAGE URL 1" />
 <meta itemprop="url" content="PRODUCT URL 1" />
   </div>
<div itemscope itemtype="http://schema.org/PromotionCard">
 <meta itemprop="image" content="HTTPS IMAGE URL 2" />
 <meta itemprop="url" content="PRODUCT URL 2" />
    </div>
<div itemscope itemtype="http://schema.org/PromotionCard">
 <meta itemprop="image" content="HTTPS IMAGE URL 3" />
 <meta itemprop="url" content="PRODUCT URL 3" />
    </div>
How to Create a Full Product Carousel Annotation
<div itemscope itemtype="http://schema.org/Organization">
      <meta itemprop="logo" content="https://other-editors.s3.amazonaws.com/images/00593/OptimoveHex.png" />
    </div>
<div itemscope itemtype="http://schema.org/PromotionCard">
 <meta itemprop="image" content="HTTPS IMAGE URL 1" />
  <meta itemprop="headline" content="UPDATE WITH 1-2 LINE PRODUCT DESCRIPTION" />
  <meta itemprop="price" content="UPDATE WITH OPTIONAL PRICE" />
  <meta itemprop="priceCurrency" content="USD" />
  <meta itemprop="discountValue" content="UPDATE WITH OPTIONAL DISCOUNT AMT" />
  <meta itemprop="url" content="PRODUCT URL 1" />
    </div>
<div itemscope itemtype="http://schema.org/PromotionCard">
 <meta itemprop="image" content="HTTPS IMAGE URL 2" />
 <meta itemprop="headline" content="UPDATE WITH 1-2 LINE PRODUCT DESCRIPTION" />
 <meta itemprop="price" content="UPDATE WITH OPTIONAL PRICE" />
 <meta itemprop="priceCurrency" content="USD" />
 <meta itemprop="discountValue" content="UPDATE WITH OPTIONAL DISCOUNT AMT" />
 <meta itemprop="url" content="PRODUCT URL 2" />
    </div>
<div itemscope itemtype="http://schema.org/PromotionCard">
 <meta itemprop="image" content="HTTPS IMAGE URL 3" />
  <meta itemprop="headline" content="UPDATE WITH 1-2 LINE PRODUCT DESCRIPTION" />
 <meta itemprop="price" content="UPDATE WITH OPTIONAL PRICE" />
  <meta itemprop="priceCurrency" content="USD" />
  <meta itemprop="discountValue" content="UPDATE WITH OPTIONAL DISCOUNT AMT" />
  <meta itemprop="url" content="PRODUCT URL 3" />
    </div>
Promotions’ Impact on Open Rates
Emails optimized for Gmail’s Promotions tab might have lower reported open rates. This is due to the fact that when a subscriber clicks on the CTA via a Promotion, that user is taken directly to your specified landing page, bypassing your email.
As a result, no open is generated, recorded, or reported on by SendGrid or OptiMail.
However, Google’s Engagement Team has confirmed that this level of engagement ranks higher than an open towards reputation/deliverability.
Gmail Annotations Best Practices
Create a Gmail Tab test account
By creating a Gmail Tab test account you can see features before the general public and access a more aggressive ranking and bundling of emails that make testing easier. It is recommended you create a Gmail account for testing purposes similar to YOURBRAND.promotabtesting@gmail.com
Single Image Preview
In order to make your image preview stand out, follow these three simple guidelines:
1. Avoid text-only: This space was designed for visual components to enhance engagement and brand recognition.
2. Crop smart: While Google will auto-fit your image to the space allowed, consider an aspect ratio of 3:9 or an image size of 538×138 pixels. GIF and WEBP are not supported.
3. Keep images fresh: Avoid reusing images from email to email so as not to have your email disregarded or viewed as being a duplicate by subscribers
Green Deal Badge
In order to make the most out of your green deal badge follow these three simple guidelines:
1. KISS (Keep It Short & Sweet): Avoid using more than four words or using whole sentences – it will compete with the subject line and will truncate.
2. Don’t use for other actions: Use for “Free Shipping” or “Save $20 Now”, but do not use for CTAs like “Open Now.”
3. Keep it relevant: For the optimal user experience, ensure the deal is relevant to what the subscriber will see when the message is opened.
Logo URL
In order to ensure your logo is displayed in the email preview, use an HTTPS URL. HTTP URLs will not work leading to your logo not being displayed. You can easily grab an HTTPS URL from OptiMail’s File Manager.
Note: The logo image will only be seen in the email preview, but it creates a level of trust in your subscriber's mind.
Promo Code & Expiration Date
Finally, follow the below guidelines to optimize your promotion code and expiration date:
1. Only use a discount code: Remember, the promo code always will say “Code” before the annotated text, so be sure to use an actual code or don’t include anything.
2. Why use expiration dates: It helps the Google algorithm determine when to preview an email, tease it, and more. For example, the email will be previewed when it’s first sent and again three days before expiration.
3. Don’t forget time zone: Include the exact time and time zone information to get granular with start and end times. For more information on date formatting, click here.