
Preparing to Use Email Personalization Tags
You can use these tags in any email template’s subject line and/or up to 100 personalization tags in an email body.
Personalizing Text
Once you’ve set up your tags, you can use them in any email template’s subject line and/or up to 100 Personalization Tags in an email body.
To do so in the HTML Editor:
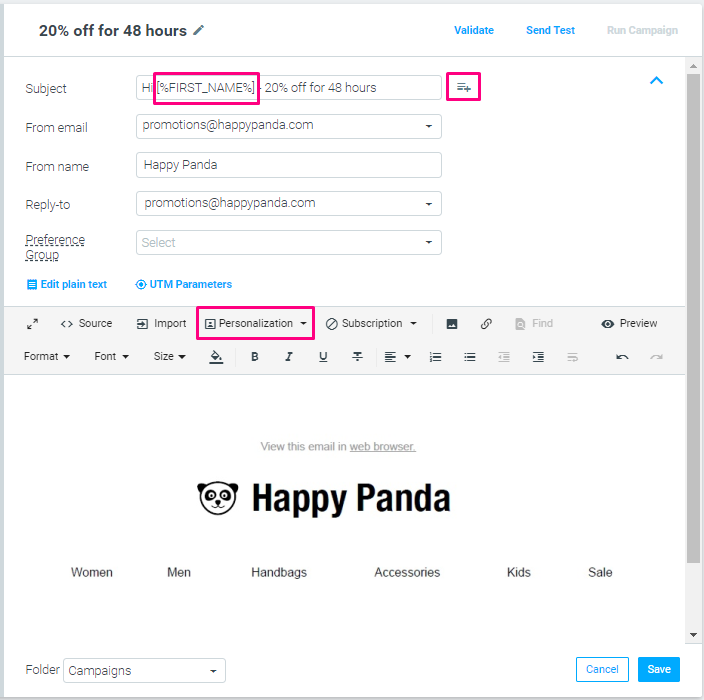
While editing an email template, select the desired tag from the "Personalization" tag list associated with the "Subject" line and/or email body, as highlighted here:
To do so in the Visual Editor:
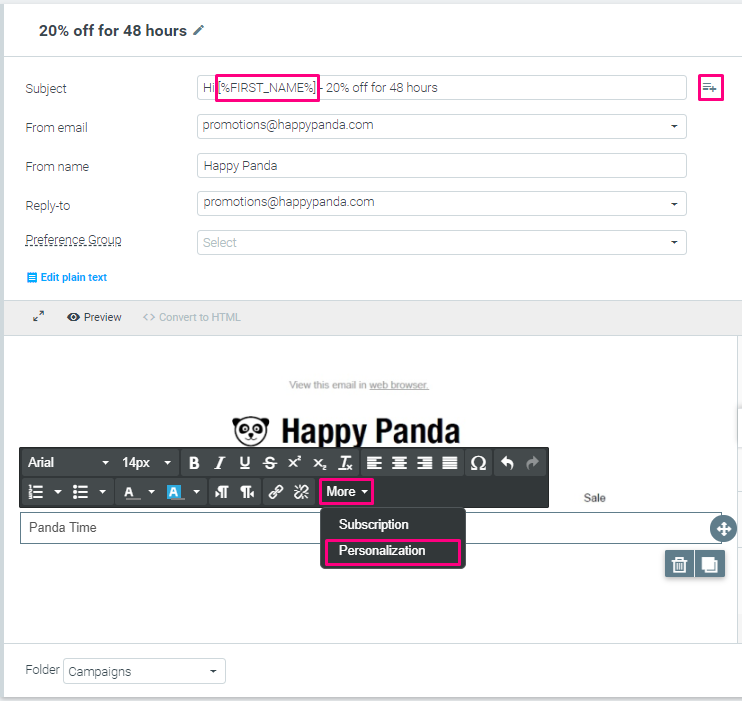
While editing an email template, select the desired tag from the Personalization Tag list associated with the Subject line and/or email body (in text content blocks), as highlighted here:
Personalizing Images and Links
You can also use tags to dynamically deliver particular images and/or links, based on customer data. For example, you can build an email template that customizes a banner image based on each recipient’s favorite product category. You can also include dynamic links within the email that point different customers to different web pages based on their past behavior.
- You want to use the [%FAVORITE_CATEGORY%] tag to customize the email’s banner image.
- The database has 20 different values for this field, such as dresses, shoes, and skirts.
- Your email template will contain an image link that appears as
<img src=”https://www.happypanda.com/images/[%FAVORITE_CATEGORY%].jpg” />. - You will prepare 20 different banner images to be hosted on your website, named according to each possible tag value:
Tag Value |
Image URL |
|---|---|
Dresses |
https://www.happypanda.com/images/dresses.jpg |
Shoes |
https://www.happypanda.com/images/shoes.jpg |
Skirts |
https://www.happypanda.com/images/skirts.jpg |
... |
... |
<a href=”https://www.happypanda.com/landingpages/[%FAVORITE_CATEGORY%]”> … </a>.
Important implementation notes:
- All image/link URLs must be located in the same domain defined for your Email account. In other words, images and linked landing pages cannot be located on a third-party site.
- All image/link URLs must be entered manually in the email template body editor by typing in the tag placeholder where the value will appear, as seen in the examples above. Any Personalization Tags will be lost if you attempt to add the link using the editor’s import options (Import Template or Import Image). This is because the import function causes the image to be uploaded and hosted on the Optimove content delivery network (CDN), and an automatically generated URL is inserted into the email.
- When you’ve completed crafting your template, click the Validate link to confirm that all the tags used are valid and available.
Personalization Tags for Triggered Campaigns
You can use event parameters as personalization tags when creating templates for Triggered real-time campaigns.
To do so, click on Personalization as usual from the HTML or Visual Editor, and select your tag from the Activity Data tab.
Please note:
Real-time Personalization Tags must be associated with the event(s) that triggered the campaign. For example, if an "added_to_wishlist" event triggered the campaign, and it includes the parameters "item_category" and "item_name" but does not include "item_price" - only "item_category" and "item_name" can be used as personalization tags in the template, but "item_price" cannot.