Please note:
To unlock this capability, you will need to have added Webpage Pop-Ups to your Optimove package. If you can’t see this feature in your Optimove instance, contact your CSM to find out more.
Trigger a personalized website pop-up for visitors, as they enter your website. For example, trigger a pop-up when someone signs up for your newsletter or creates an account.
|
Capability
|
Example Options
|
|---|---|
|
Target Audience
|
Visitors
|
|
Platform Support
|
Web
|
|
Execution Type
|
Triggered campaign
|
|
Trigger
|
Website visit
|
|
Common Use Cases
|
|
|
Execution Channel
|
Webpage pop-up
|
The below steps exemplify the Newsletter pop-up use case. However, they apply to each of the different Common Use Cases. Where variations are required, they are noted.
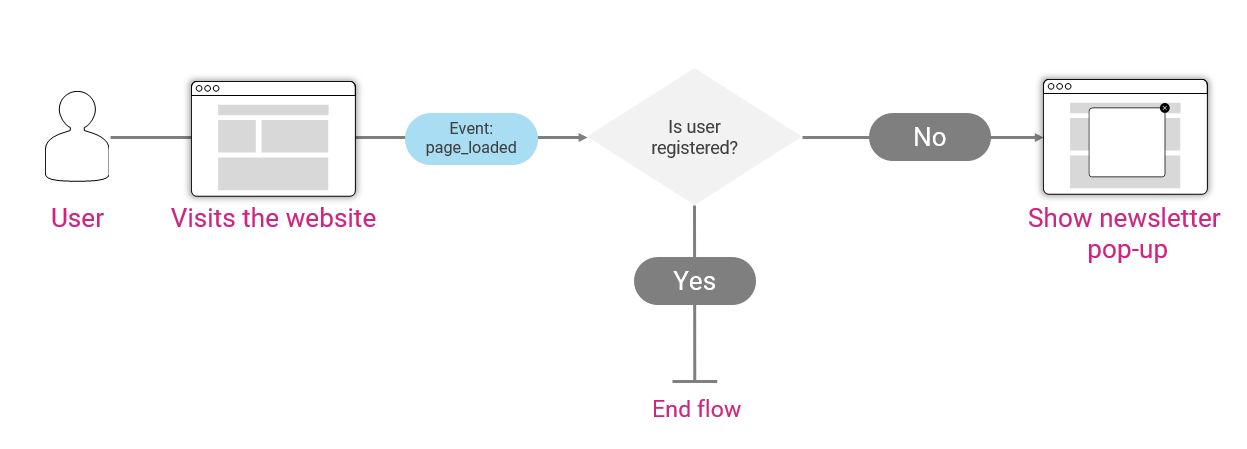
Here is the triggered campaign flow for a typical newsletter sign-up pop-up:
Trigger and Campaign Setup
To execute the pop-up campaign upon a visitor’s first visit day, the following steps are required:
1. Add Your Events
Add code to the relevant places in your website to report a 'page_loaded' event, using the reportEvent() function of the Optimove Web SDK. The structure of this call is reportEvent('page_loaded', params); where params is an object containing the following named parameters and their values:
- URL
- page_title
- page_category
- additional parameters optional
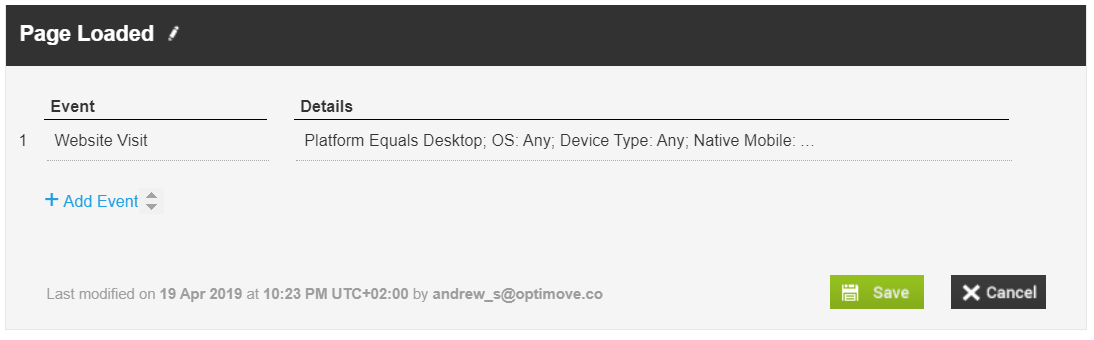
2. Define Your Triggers
In Optimove’s Manage Triggers page, define a trigger based on this custom event. For example:
You can use the event parameters to define a more specific trigger. For example, only when a page_loaded event contains a specific page_url, or page_loaded events performed only on the website.
3. Define target groups for this campaign.
For more information on these target groups, see Creating Behavior-Based Target Groups. For Example:
|
Use Case
|
Sample Target Group
|
|---|---|
|
Newsletter Pop-Up
|
|
|
Cross-Sell Campaign
|
|
4. Configure the campaign.
You can define identical campaigns for first-time and returning visitors, or address the two groups differently, by assigning a different marketing action, creative, or promotion.
To create the campaign for each target group:
- Create the webpage pop-up template for the campaign. For information on adding personalization tags to a webpage pop-up template, click here.
- Define triggered campaigns for each of the target groups mentioned above, using Page Loaded as the trigger.
- Select Webpage Pop-up as the execution channel.
- Specify the date range during which this campaign will run.
- (Optional) Specify the maximum number of times the campaign may be triggered for eligible visitors.
- (Optional) Specify the delay (in seconds) for triggering the pop-up (i.e., if a delay of x seconds is specified, the pop-up will appear x seconds after the campaign was triggered).
- Select a marketing action.
- (Optional) Select a promotion.
- Select the pop-up template to use when executing the campaign.