
What is the Email Preference Center?
An email preference center allows your customers to easily choose which types of email communications they receive from you, and to update those choices at any time. Providing customers with this flexibility helps you maintain a healthy communication cadence with your customers. And because they can selectively opt-in or opt-out of different types of emails – as opposed to clicking a blanket unsubscribe link – the chances are better that you will still have permission to keep in touch with your customers via certain types of emails.
Sample Preference Center
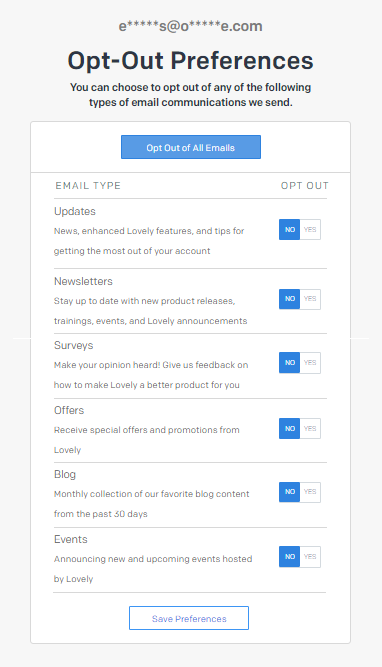
How to Implement the Email Preference Center
To begin letting your customers use your email preference center, you need to perform four steps, as detailed in the following sections of this page:
- Create Preference Groups for each different type of email you send.
- Enable the Email Preference Center in the Optimove Admin.
- Link each Email template with a particular Preference Group in Email.
- Add a Manage Email Preferences link in each Email template.
Creating Preference Groups
You should create a different Preference Group for each different type of email you send (e.g., newsletters, sales announcements, product recommendations). Once you’ve defined each group, you need to link each email template to its proper Preference Group (as described in Step 3, below), to ensure that customer preferences are respected. Your CSM is responsible for creating preference groups within the backend (via SendGrid) once the client team has provided them with the exact group names and descriptions they want to include.
|| Please do not attempt to use the SendGrid API or user interface to define/manage Preference Groups, as this may cause your Preference Center implementation to fail.
Enabling the Email Preference Center
To enable the Preference Center:
Linking Each Template to a Preference Group
The next step is to link each Email template with a particular Preference Group. This is necessary so that customers who have excluded themselves from the selected Preference Group will no longer receive emails that use the template.
|| Important notes
- You must select a Preference Group for each template in order to add the Manage Email Preferences link in the next step.
- If the Preference Group drop-down list does not appear, return to Step 2, above, to enable the Email Preference Center.
Inserting a Manage Email Preferences Link in Each Template
You can insert the Manage Email Preferences link in Email templates using the HTML Editor, the Visual Editor, or by adding a tag into your custom HTML template, as described in the following sections.
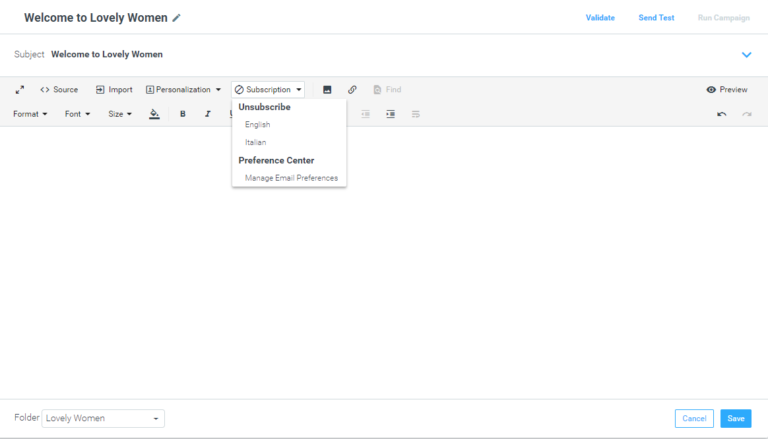
Using the HTML Editor
- Open the HTML Editor for the template in which you want to add the Manage Email Preferences link.
- Position the cursor in the place where you want the link to appear.
- Click the Subscription pull-down list in the editor’s toolbar.
- Select Manage Email Preferences to insert the link.
Using the Visual Editor
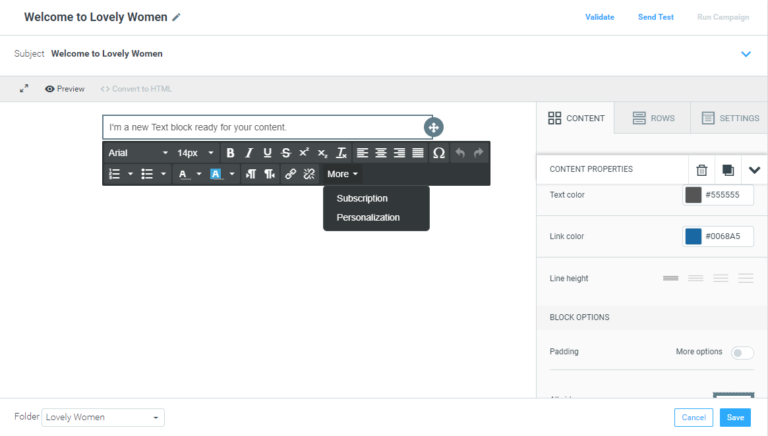
- Open the Visual Editor for the template in which you want to add the Manage Email Preferences link.
- Position the cursor in the place where you want the link to appear.
- Click the More pull-down list in the editor’s toolbar and select Subscription.
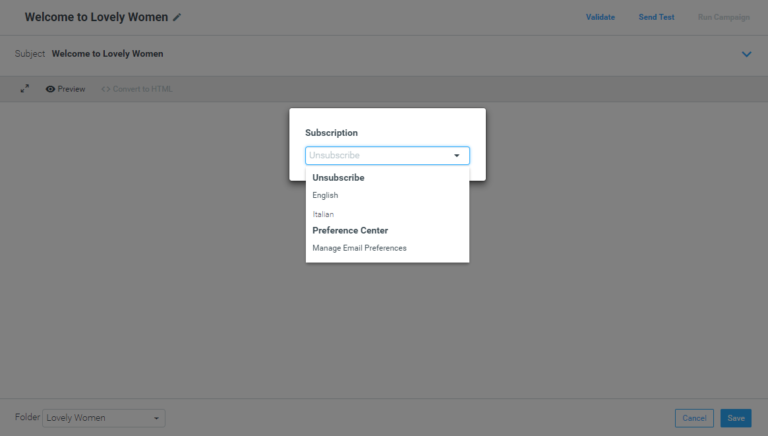
4. From the drop-down list that appears, select Manage Email Preferences.
Custom HTML Template
To include the Manage Email Preferences link in a custom HTML template, insert this tag at the desired location:
|| Important Notes:
- The default text linked to the Preference Center is “Manage Email Preferences”. If you wish to change this text, edit it manually in the editor after inserting it. Note that there may be legal implications of the particular wording used (for example, the CAN-SPAM Act in the United States requires that “Your message must include a clear and conspicuous explanation of how the recipient can opt out of getting an email from you in the future. Craft the notice in a way that’s easy for an ordinary person to recognize, read, and understand.”).
- Once the Preference Center is enabled (as described in Step 2 above), a Manage Email Preferences link will always appear in emails using any template that is linked to a Preference Group unless a global Unsubscribe link is included. If you have inserted neither a Manage Email Preferences link nor a global Unsubscribe link in a linked template, two default links (Unsubscribe from This List and Manage Email Preferences) will automatically be added by the system to the bottom of every email sent. Thus, including the Manage Email Preferences link yourself is recommended, as you prefer it to appear, in every linked Email template.
- Once you have enabled the Preference Center and linked your templates to Preference Groups, you should cease using the global Unsubscribe link. This reduces the number of customers who unsubscribe from all your emails. Of course, any customer can still unsubscribe from all your email communications using the Preference Center link/page.
- In addition to using the Email Manage Templates page, you may also add, remove, or modify the particular Preference Group linked to a particular Email template using the Optimove API. For details, see the Email Functions section of the Optimove API Guide.
Unsubscribing via the Preference Center
As mentioned above, customers can selectively opt-in or opt-out of different types of emails via the Preference Center. Customers can choose whether they want to unsubscribe from all emails or from a specific Preference Group.
By clicking the "Opt Out from all emails" button, a customer will be automatically removed from any email communication and added to the Global Unsubscribe list. This will be updated in the Campaign Analysis channel metrics (the customer will be shown as unsubscribed) and reflected in the relevant Email unsubscribe attribute.