
Creating Target Groups
Step 1 – Create your Target Group(s)
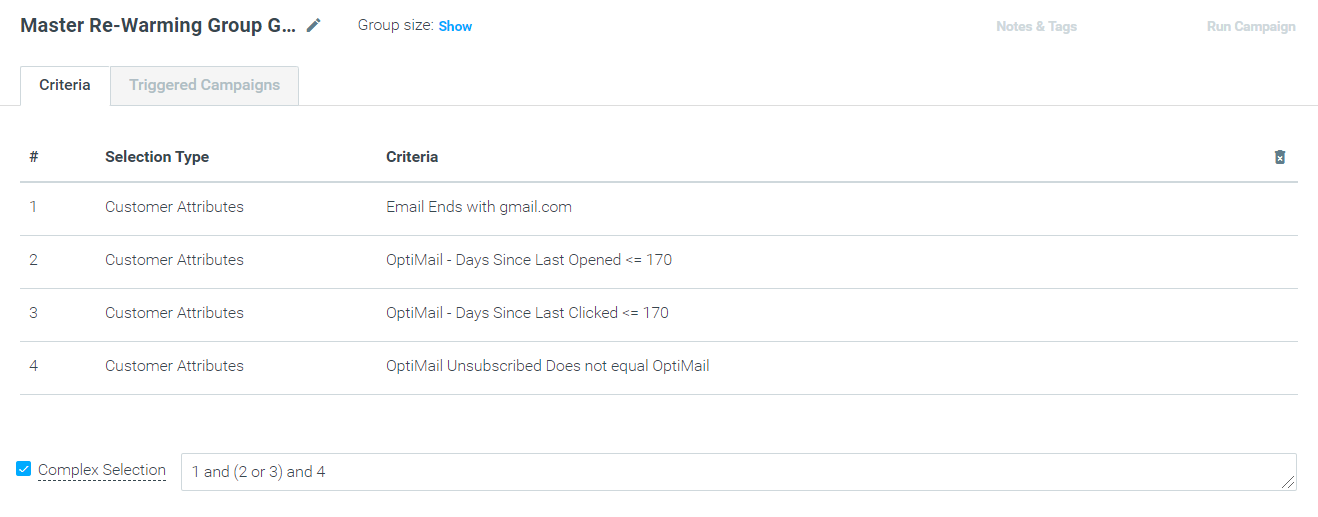
Regardless of how you create your Target Groups for executing your re-warm-up campaigns, you’ll want to start by creating a master Target Group that looks to contain all opted-in, recently engaged subscribers by domain. Dependent on your unique deliverability situation, you may need to create a master Target Group for just one domain (i.e., you’re only seeing Gmail blocking your messages from being delivered) or one for each domain (i.e., your sending activity has been dormant for 30+ days).
- Create a new Target Group and consider naming it “Master Re-Warming Group X” and replacing “X” with the ISP or domain name for the group. In this example, we’ll be using Gmail.
- Under “Customer Attributes”, choose “Email” or the attribute your account uses for a subscriber email address and select that.
- For “Condition”, choose “Ends with”
- For “Value”, select “@gmail.com”
- Select “Add” to add the Attribute to your Target Group.
- For “Condition”, choose <=
- For “Value”, choose a value no greater than 180 (NOTE: You’re looking to pull in just those subscribers who have most recently engaged with your emails. Expanding past 6 months is not considered “recent” by ISPs).
- Select “Add” to add the Attribute to your Target Group.
- Be sure to select the correct Condition and Value so that only those users who are opted in are included in your Target Group.
- Select “Add” to add the Attribute(s) to your Target Groups.
|| Note: If your IP has cooled down or you’ve found that an ISP has blocked you before you’ve had sufficient time to collect subscriber open and click data for email engagement (i.e., at least within the last 90 days), you can consider secondary attributes that might denote a user’s propensity to engage with your email. Consider attributes that look to the recency of the last order/purchase, days since registration, etc.
6. Now that you have added all key attributes, select “Complex Selection.”
- Depending on the order in which you created your attributes, you’ll want to set your Open and Clicked attributes within parentheses so that they reflect an “OR” statement. All other attributes would be outside of the parentheses and “AND” statements.
If you have questions on how to set up a Complex Selection, contact your CSM.
Step 2 – Choose your method for daily Target Group size increases
How you decide to reduce your master Target Group into smaller mailable Target Groups for your re-warm-up campaigns is your choice, and we provide you with two (2) options. However, it is imperative that you start off small, never increase sending volumes by more than 2X what you sent in your previous execution, and always be mindful of each ISP’s throttling thresholds.
Which option should I choose?
It’s best to choose the option that fits your unique re-warming situation. Are you re-warming because you were blocked by a particular ISP? We recommend a more conservative approach – using Option B, as it allows more control over daily volumes. Are you re-warming because of inactivity on the IP for 14+ days? You’ll probably be safe to execute campaigns using Option A since it affords you the ability to resume sending at smaller volumes, but without the specific daily quantities in the way you originally warmed your IP.
Option A
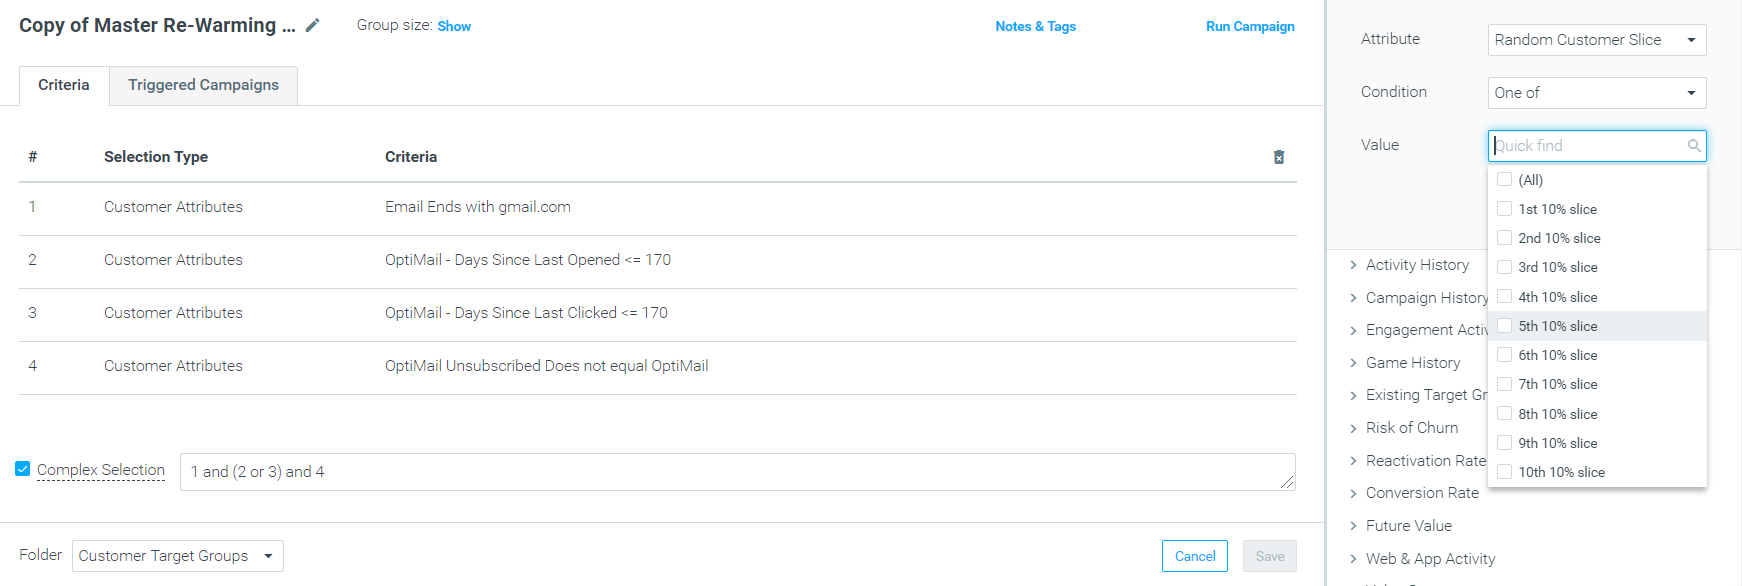
1. Option A uses Optimove’s “Random Customer Slice” attribute, which allows you to randomly grab up to 10 “slices” of a Target Group – each accounting for 10% of the total volume of that group size. First, you will want to check your domain’s master Target Group size to understand how big/small each slice will be.
2. Next, duplicate the domain-based master Target Group. Consider naming this using the ISP/Domain name and the date of the campaign/re-warm-up send.
- Update the Target Group by adding the Attribute “Random Customer Slice”.
- For “Condition”, choose “One of.”
- For “Value”, select the number of slices necessary for the smallest volume/first send.
- Update the “Complex Selection” – have the “Random Customer Slice” as an “AND” and outside of the parentheses.
- Add this to your Target Group and save. This is now your Target Group for your first re-warm-up campaign.
Option B
1. Option B requires you to manually separate your subscribers into smaller CSV files to re-upload into Optimove for campaign execution. However, this gives you more control over the Target Group size by sending. First, go to Analysis & Research Customer Explorer.
- Choose the domain-based master Target Group you created in the drop-down for “Target Group.”
- Make sure for “Select Attributes” you have “Email – Days Since Last Opened” and “Email – Days Since Last Clicked” selected.
- Select “Export” to export the Target Group as a CSV file.
- If you are re-warming Gmail, Yahoo, AOL, or all other non-Microsoft domains, start by grabbing the first 20 subscribers listed in your CSV file and copying them to a new CSV file. These will be the users who receive your first re-warm-up campaign.
- Save the CSV file on your desktop or in your Cloud so that you know the ISP and the date, and day (i.e., 1st send).
- Continue to pull subscribers moving from the top down of your spreadsheet, doubling volume each time (i.e., 20 > 40 > 80 > 160 > 320, etc).
- For Microsoft domains such as Hotmail, MSN, and Outlook, the first send will only include 15 subscribers, and your daily increase will grow at a different rate due to their throttling thresholds:
15 > 20 > 30 > 45 > 75 > 150 > 300, and then you can begin to double the volume.
Choose your re-warm-up strategy
Just as you have the option for how you develop your individual Target Groups, you have the flexibility in how conservatively or aggressively you re-warm your IP as well.
Which option should I choose?
Option A
- Determine when you would like your first post-re-warming campaign to deploy. This would be the campaign you’ll send to your complete Target Group without the need to separate subscribers by domain and volume size.
- Understand the campaign’s total Target Group size. For example, if your first post-re-warming campaign has a volume of 200K, then the last re-warming send should not be less than 100K in volume, as the rule to follow is “send no more than 2X the volume of your previous send.”
- Create a re-warming strategy/plan that allows for multiple campaigns sent per day until all smaller domain Target Group campaigns that work to increase in volume have been sent.
- These can be sent at a frequency of between 2-4 times/day.
- It’s important to allow for no less than 4 hours between each campaign. For example, one day could have a total of four (4) campaigns with send times of 8 am, 12 pm, 4 pm, and 8 pm.
Option B
- Determine when you would like your first post-re-warming campaign to deploy. This would be the campaign you’ll send to your complete Target Group without the need to separate subscribers by domain and volume size.
- Understand the campaign’s total Target Group size. For example, if your first post-re-warming campaign has a volume of 200K, then the last re-warming send should not be less than 100K in volume, as the rule to follow is “send no more than 2X the volume of your previous send.”
- Create a re-warming strategy/plan that allows for one campaign send/day until your last day of re-warming has a total send volume that equates to half of what your anticipated post-re-warming campaign volume should be.
- If, after five (5) days, the data in your Campaigns Deliverability Dashboard indicates a successful re-warming effort, you may be able to increase the frequency of your campaigns by sending two (2) re-warming campaigns/day – separated by no less than 4 hours between each campaign. This will help to increase your daily send volumes more quickly.
- Continue to schedule your campaigns until all groups have been scheduled. Utilize your Campaigns Deliverability Dashboard in the BI Studio to watch for any decrease in opens as you increase send volumes, increases in spam complaints, increases in bounces, or other indicators that may suggest performance issues with your re-warm-up strategy.