
|| Note: Due to iOS 15+ Privacy Changes, Email opens have become less reliable, and Optimove suggests that users split responses based on 'revenue gained' / another KPI or 'link clicked' instead.
Visual Stream Builder Use Cases
Using the Visual Stream Builder allows you to leverage a blank canvas to easily map and create interconnected campaign flows (Streams).
The Visual Stream Builder is a great tool for creating time-delimited Streams with a limited number of steps or a clear order for the steps. Below are example use cases of different ways to use the Visual Stream Builder.
|| Please note: By default, campaigns created as part of Streams are subject to overarching prioritization and exclusion rules. For the limited scenarios where you would not want this to happen, please see the relevant use case below.
Creating a Single Treatment Stream
One potential use is to create a Stream of campaigns without testing it against a competing one or a control group. For example, you can create a welcome Stream, providing your customers with a unified onboarding experience using a series of pre-determined communications.
- Go to the Stream Builder page under Execute.
- In the toolbar, you can complete the following actions:
- Define your Streams’ settings and objective.
- Choose the Stream's name.
- Select the date range for the Stream to run.
- In the canvas, name Treatment A and place 100% of the customers in this Stream. At this point, Treatment B will become unavailable.
- Modify your Target Group and map out your flow.
A/B Test Stream
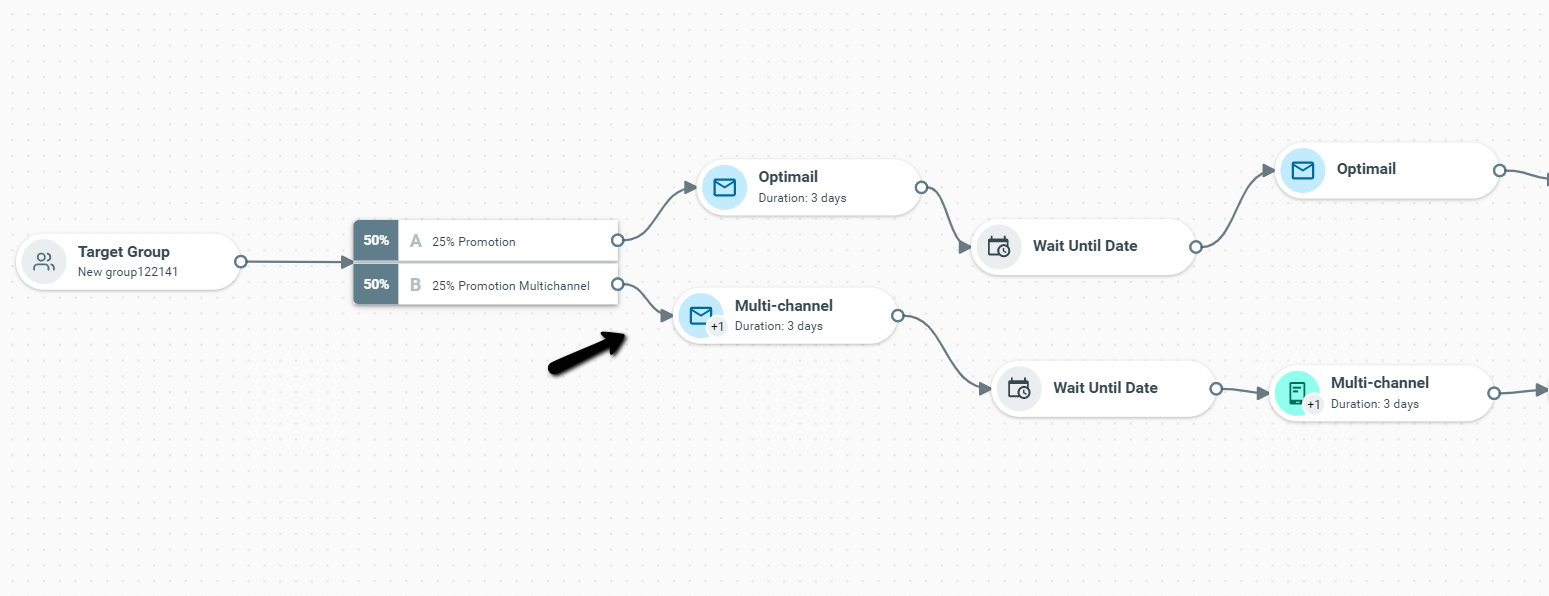
Streams allow you to test different flows against one another. Similar to A/B testing, you can test two different flows for the same customer Target Group to evaluate them and identify the one that generates the highest uplift.
- Go to the Stream Builder page under Execute.
- In the toolbar, you can complete the following actions:
- Define your Streams’ settings and objective.
- Choose the Stream's name.
- Select the date range for the Stream to run.
- In the canvas, name Treatment A and Treatment B, and allocate a specific percentage of your customers to each. For example, divide them equally between them (50% in each).
- Click “Apply” and map out two different flows for each Stream.
Creating Test/Control Streams
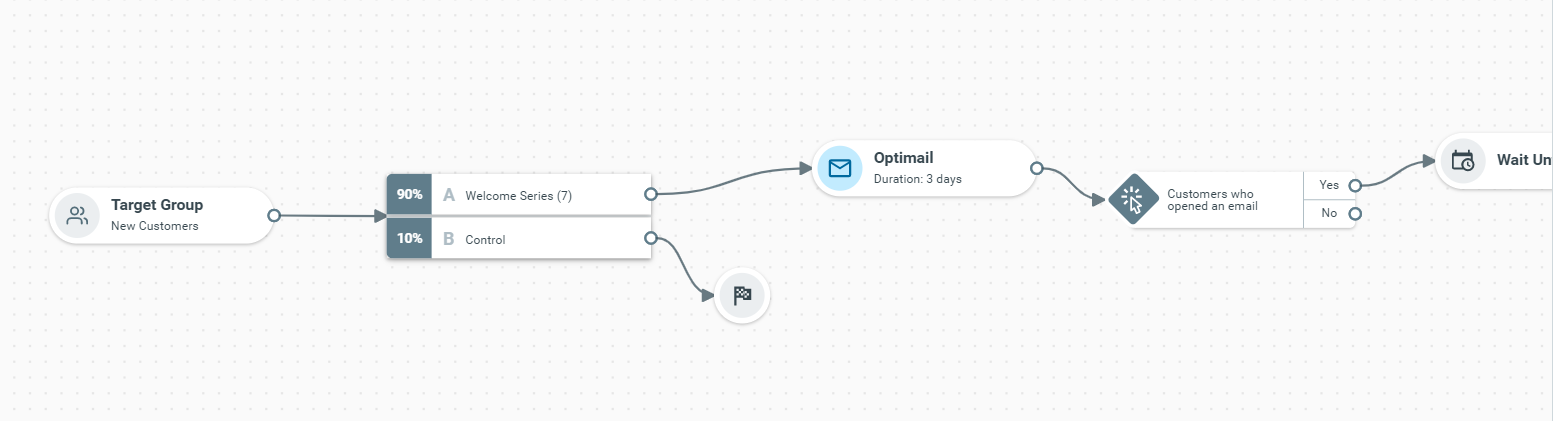
Dividing your customers into test and control groups in a campaign is the only way to measure the incremental uplift each campaign has on your marketing efforts.
- Go to the Stream Builder under the Execute section.
- In the toolbar, you can complete the following actions:
- Define your Streams’ settings and objective.
- Choose the Stream's name.
- Select the date range for the Stream to run.
- Name Treatment A and Treatment B, indicating one Stream as a test and the other as a control, and determine the percentage of customers you would want in each, such as 90%/10% or 80%/20%, etc.
- Choose your Target Group and to map out Stream A’s flow. To leave Stream B, empty your control Stream, andS add an exit point at the beginning of Stream B.
Lock Customers into a Stream
Although in most cases you will want to let your customers plot their own journeys, effectively enabling customers to jump between flows, there are cases in which you would like to lock customers into a specific flow to ensure they follow a specific experience.
- Go to the Stream Builder under the Execute section.
- In the toolbar, you can complete the following actions:
- Define your Streams’ settings and objective.
- Choose the Stream's name.
- Select the date range for the Stream to run.
- Name Stream A and Stream B, and divide your customers into each one based on the selected strategy: A/B testing, Test/Control, or single Stream.
- Start to create your flow.
- A Target Group with the New lifecycle stage will automatically be created. To modify your Target Group, simply add additional selection criteria. Then, map out your flows.
- Go to the Target Groups page, select the Streams folder, and locate your onboarding Stream folder. Assign the highest priority to the Target Groups in this folder.
|| Please note
Locking customers into a Stream by manually prioritizing its campaigns above all else might lead to broken journeys. Broken journeys occur when customers continue to receive automated messages from a specific flow even after their status has changed. To avoid this, use auto-priority when prioritizing Target Groups within a Stream.
Read more about broken journeys in this article.
Hybrid Streams Use Cases
Real-Time Trigger customer? You can combine both triggered and scheduled campaigns in your Stream flow! Follow these guidelines, or read on for example use cases.
|| Open Beta: This capability is currently in Open Beta and may not be available to all customers. For information beyond this article, please reach out to your Customer Success Manager.
Nurturing Flow for Reactivated Customers
In this use case, we’ll demonstrate how you can combine both triggered and scheduled campaigns in a dedicated nurturing flow.
- Go to the Stream Builder under the Execute section.
- In the toolbar, you can complete the following actions:
- Define your Streams’ settings and objective.
- Choose the Stream's name.
- Select the date range for the Stream to run
- Name Treatment A and Treatment B based on the selected strategy.
For example, let’s name the Stream “Purchased (Realtime) vs. Control Churned Customers”. Then, determine the percentage of customers in each treatment (for example, 90%/10% or 80%/20%). - Click on “Create Stream” to open the Visual Streams Builder and create your flow.
- Build a Target Group. To modify your Target Group, simply add additional selection criteria.
- Map out your flows.
- Go to the Manage Target Groups page, select the Streams folder, and assign the highest priority to the Target Groups in this folder to make sure that these customers receive your flow.
Announcing a Flash Sale to Increase Net Revenue
In this use case, we'll go over how you can combine both triggered and scheduled campaigns in a dedicated flash sale flow.
- Go to the Streams Builder page and click on Create New Stream.
- Select your objective. In this case, we chose to increase Net Revenue.
- Define your stream’s settings.
- Choose the stream's name.
- Select the stream’s date range.
- Name Treatment A and Treatment B based on the selected strategy. For example, let’s name the stream “Flash Sale flow vs. Flash Sale Control”. Then, determine the percentage of customers in each treatment, (for example, 90%/10% or 80%/20%).
- Click on “Create Stream” to open the Visual Streams Builder and create your flow.
- Build a target group. To modify your target group, simply add additional selection criteria.
- Map out your flows.
- Go to the Manage Target Groups page, select the Streams folder, and assign the highest priority to the target groups in this folder, to make sure that these customers receive your flow during the sale.
Announcing a Happy Hour on a Specific Game to Encourage Bets
In this use case, we will demonstrate how you can set up a dedicated flow for a happy hour campaign on a specific game.
- Go to the Streams Builder page and click on Create New Stream.
- Select your objective. In this case, we chose to increase Net Revenue.
- Define your stream’s settings.
- Choose the stream's name.
- Select the stream’s date range.
- Name Treatment A and Treatment B based on the selected strategy. For example, let’s name the stream “Happy Hour flow 1 vs. Happy Hour Control”, and determine the percentage of customers in each treatment (90%/10% or 80%/20%, etc).
- Click on “Create Stream” to open the Visual Streams Builder and create your flow.
- Build a target group. To modify your target group, simply add additional selection criteria.
- Map out your flows.
- Go to the Manage Target Groups page, select the Streams folder, and assign the highest priority to the target groups in this folder, to make sure these players receive campaigns during the happy hour.