
UTM parameters are simple parameters that can be attached to URLs in order to track a link’s source, medium, campaign name, and more (learn more here).
How to Add/Edit UTM Parameters in Email Templates
Video Transcript
If you’re currently using Google Analytics to track website performance and individual digital program performance – then you’re familiar with UTM parameters. If not, UTM parameters are simply tags that you can add to the URLs or links through your email. When a user clicks on a link that’s been appended with UTM parameters, these tags help to provide detailed reporting and analytics within the Google Analytics platform regarding the effectiveness of your campaigns and how they’ve driven traffic to your site.
However, as you can imagine, marketing emails typically have many links – from the navigational header and footer rows to the multiple calls to action and images or content areas in between. But Email's Visual Editor and HTML Editor options provide an easy and automated way to attach these unique tags to each of the links in your individual templates without having to do so on a link-by-link basis.
Once your template has been created and all links have been applied to text, content, and images, click the blue drop-down arrow in the upper right corner of your Manage Template’s canvas. This is true for both the HTML Editor and the Visual Editor. This will open the area that reveals the text entry sections for your template’s subject line, from email address, from name, and the reply-to address. You’ll also see the blue clickable area for UTM Parameters. Again, this will appear in the same location for both the Visual and HTML Editors.
When clicked on, you’ll reveal the options for entering multiple tags or UTM parameters for source, medium, campaign, term, and content. You do not need to append all terms. You only need to fill in as many tags as your business needs require.
Quick Tip
Some clients use “Email” as the UTM source and then work down in hierarchy because Google Analytics will provide reporting data starting from the program level down to the campaign, or email template level. It’s a good rule of thumb to start with a broad naming convention and work down to a more narrow one when grouping parameters.
In addition to manually adding your tags, you can also utilize dynamic tags by clicking on the drop-down arrows to the right of each text entry area. These will drop down the personalization tags also available to you when creating your templates. Consider using “Lifecycle” or another attribute that helps to determine your user’s purchaser category, for more details when reviewing campaign performance.
Once completed, click Apply and all links will be appended. You can change your parameters as many times as you want per template and each time will simply override your last set of UTM parameters. Please note that the UTM Parameter feature currently applies to each individual template and is not a global setting.
In the HTML Editor, you’ll be able to switch to the source view and see links appended with your updated UTM parameters and moreover, see how they’ve been updated every time you modify or change them. However, in the Visual Editor, you’ll only be able to see your appended links when you test send your email or when you send it to your audience.
Step-by-Step Guide to Adding UTM Parameters
When building Email templates using the HTML or Visual Editor, you can use the UTM Parameters option to quickly add/edit UTM parameters for all URLs included in the template.
It is important to note that when editing UTM values using this feature, existing UTM values already appended to URLs in the template will be overwritten by the new values provided.
In order to easily edit UTM parameters in all your template’s URLs:
- Open the UTM Parameters editor (from the Template Details area)
- Type the relevant UTM values to be applied to the URLs. For example:
- utm_source=newsletter
- utm_medium=email
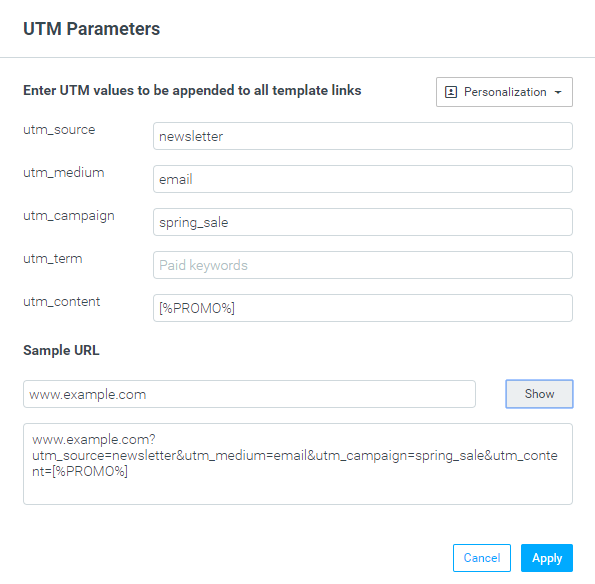
- Click Apply to update the UTM values for all URLs in the template. Note that if only several UTM values are provided in the tool, only those specific UTM parameters will be appended to URLs – if any URL had a previous value for one of those UTM parameters, it will be replaced.
- You can provide a sample URL at the bottom of the dialog in order to generate a preview, showing the URL with the selected UTM values applied.
- Optional: You can use Email personalization tags in order to create dynamic UTM values per campaign/recipient. For example, utm_content=[%PROMO%] will replace the value of this specific UTM parameter with the promo code assigned to the campaign. Any available personalization tag can be used as a UTM value.
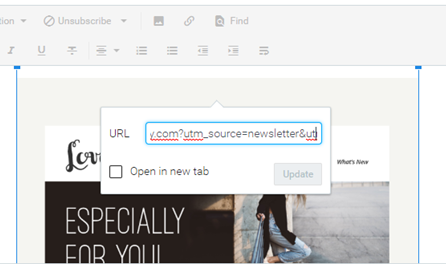
Once UTM values are applied, they are appended to all URLs in the template. For example:
UTM Parameters and GA4 Dimensions
When setting up your Email templates, if you are tracking the effectiveness of your campaigns using GA4, you should be aware of the corresponding GA4 dimensions.
| UTM Parameter | GA4 Dimension |
| utm_id | Session campaign ID |
| utm_source | Session source |
| utm_medium | Session medium |
| utm_campaign | Session campaign |
| utm_source_platform | Session source platform |
| utm_term | Session manual term |
| utm_content | Session manual ad content |