
First Email
Trigger a personalized email to a registered visitor or known customer following a sign-up or specific action, whether from your website or mobile app.
|
Capability
|
Example Options
|
|---|---|
|
Target Audience
|
Registered visitors and known customers
|
|
Platform Support
|
Web, mobile
|
|
Execution Type
|
Triggered campaign
|
|
Trigger
|
Newsletter sign-up
|
|
Execution Channel
|
Triggered email (via Optimail)
|
Here is the typical flow for a triggered campaign, immediately following a newsletter sign-up:
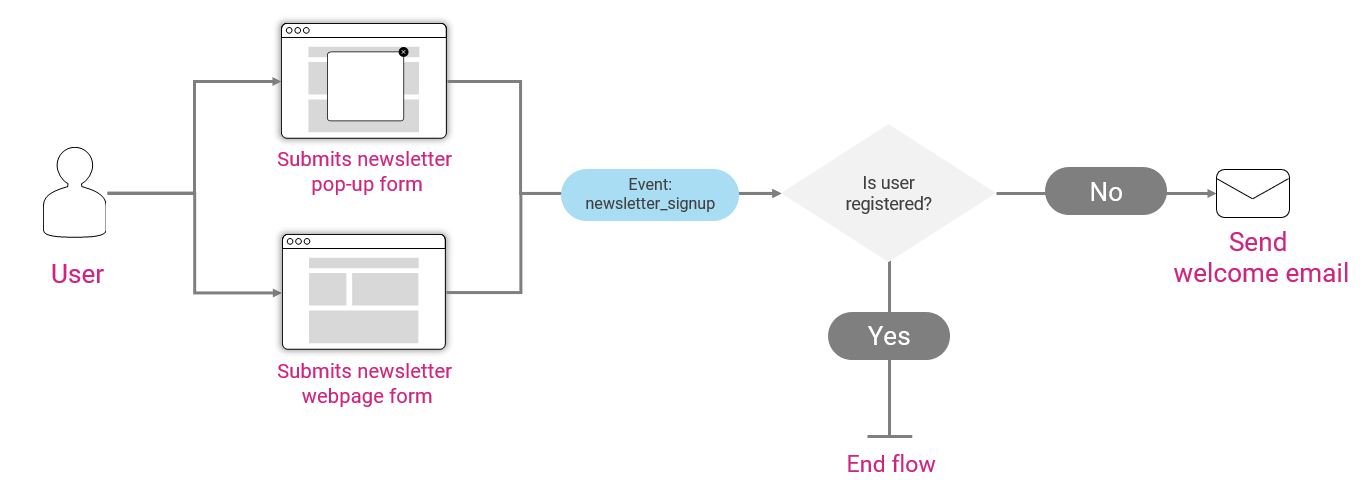
Trigger and Campaign Setup
To execute the registration email campaign, the following steps are required:
1. Use the registerUser(); function of the Optimove SDK (see Web, iOSorAndroid) to assign a visitor ID upon registration or to identify the customer.
2. Add code to the relevant places in your website and/or mobile application to report an event, such as newsletter_registration, using the reportEvent(); function of the OptimoveWeb,iOSorAndroidSDK. The structure of this call is reportEvent("newsletter_registration", params); where params is an object containing the following named parameters and their values:
- first_name
- last_name
- opt_in
- additional parameters optional
3. In Optimove’s Manage Triggers page, define a trigger based on this custom event. For example:
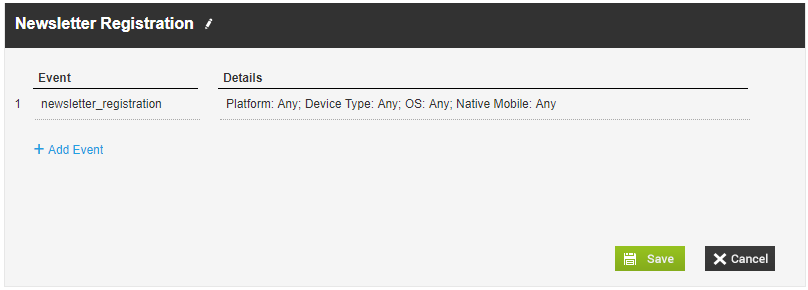
You can use the event parameters to define a more specific trigger. For example, newsletter_registration events are performed only on the website/mobile app.
4. Define two target groups for this campaign. For more information on these target groups, see Creating Behavior-Based Target Groups.
- Converted Today
- Registered Visitors
5. Configure the campaign. You can define identical campaigns for registered visitors and customers, or address the two groups differently, by assigning a different marketing action, creative, or promotion.
To create the campaign for each target group:
- Create the email templates for the campaigns on the Manage Templates page. For information on adding personalization tags to your triggered email templates, click here.
- Define triggered campaigns for both target groups mentioned above. For example, using the newsletter_registration trigger created above.
- Select Optimail as the execution channel.
- Specify the date range during which this campaign will run.
- (Optional) Specify the maximum number of times the campaign may be triggered for eligible visitors.
- Select a marketing action. It is recommended to use a unique action for this campaign so that you will later be able to build a target group of all customers who received this specific action, in order to send them a follow-up campaign.
- (Optional) Select a promotion.
- Select the email template to use when executing the campaign.
6. Follow-up campaigns can be scheduled. To learn how to see the Welcome Journey – Follow-up Email use case example.
Welcome Journey – Follow-up Email
Schedule a personalized email to registered users, several days following their registration.
Note that this campaign is a follow-up campaign to the first welcome email described in the Welcome Journey – First Email use case example.
|
Capability
|
Example Options
|
|---|---|
|
Target Audience
|
Registered visitors and known customers
|
|
Platform Support
|
Web, mobile
|
|
Execution Type
|
Scheduled campaign
|
|
Execution Channel
|
Scheduled email (via Optimail)
|
Here is the typical flow for a follow-up welcome email:
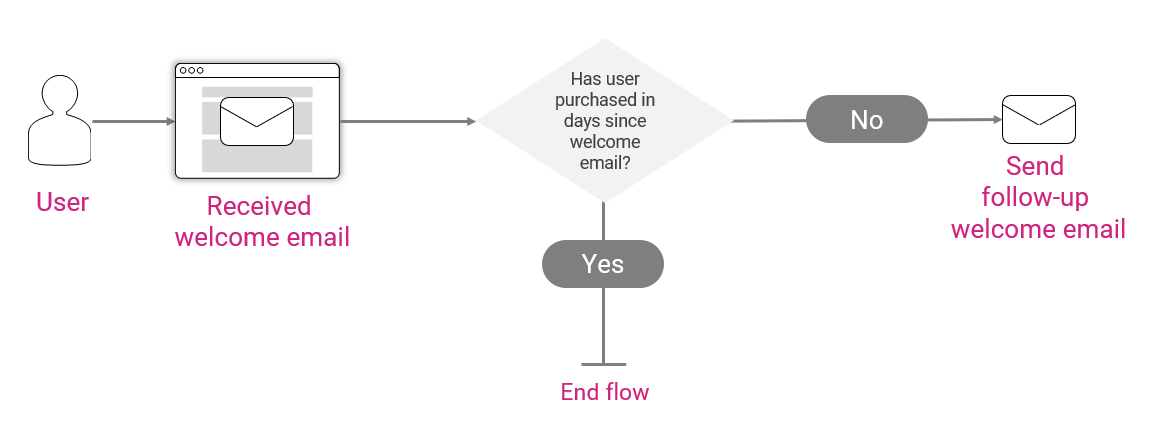
Campaign Setup
In order to execute the follow-up welcome email campaign, the following steps are required:
1. There is no need to create a trigger – this campaign is a scheduled campaign, following the initial registration.
2. Define the target group for this campaign:
- Using the Campaign History criterion, select all customers who received the first welcome email campaign in the past day (or past x days, depending on your business needs). If you created a unique action for this campaign, as suggested above, you can easily select all campaign recipients by selecting that action name here.
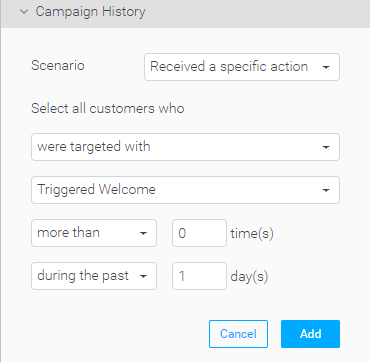
- If relevant, add criteria to limit the campaign’s audience by selecting only customers with no purchases, no activity, or any other criterion you would like to apply to this campaign.
3. Configure the campaign:
- Create the email templates for the campaigns on the Manage Templates page.
- Select Optimail as the execution channel.
- Set daily recurrence, in order to capture all registered customers on the day after their registration.
- Select the email template to use when executing the campaign.