
Setting Up the Building Blocks
To run a triggered campaign, you need to first set up the following building blocks:
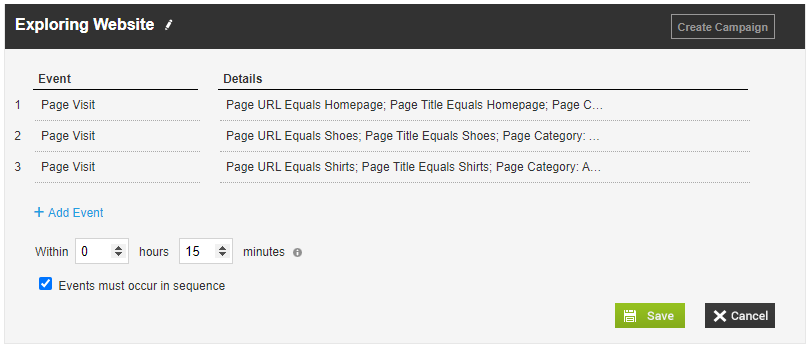
1. Define a trigger by selecting the event (or sequence of events) and the conditions applied on event- parameters that will activate the campaign. You can create triggers from the Realtime Triggers page or directly in Campaign Builder while setting up a triggered campaign.
- Define the timeframe within which all the events should occur to trigger the campaign.
- Define whether the events should occur in sequence or not and select/deselect the checkbox appropriately. If you decide the events do not need to occur in sequence, any order of occurrence within the defined timeframe will trigger the campaign. Note that all events must take place in order to activate the trigger.
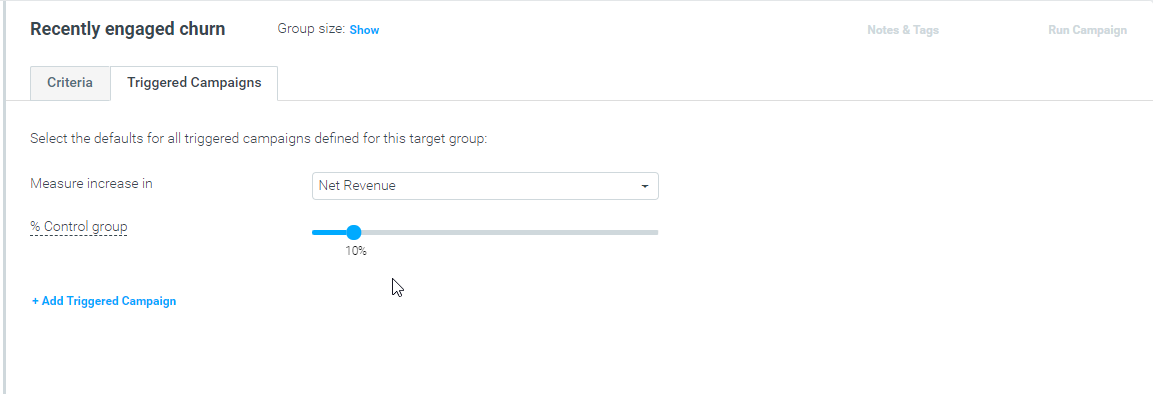
- Click in the Triggered Campaigns tab, select the desired “Measure increase in” KPI and default control group percentage. These values will be used for all triggered campaigns defined for this target group.
- You can change these values for the target group at any time, but changes made to the measured KPI or control group percentage will apply to all existing triggered campaigns defined for this target group.
Building the Triggered Campaign
Now you can start building your Triggered Campaign.
- You can either select ‘Add Triggered Campaign’ from the relevant Target Group or start building from the ‘Triggered’ tab in the Campaign Builder
- Select the Target Group and specific trigger that will activate the campaign (e.g., Cart Abandonment). In Campaign Builder, you can choose an existing trigger or create a new one directly as part of the setup.
Quick Tip: Improve cross-functional collaboration using Notes & Tags! Log campaign information and leave tags to easily find campaigns in Mission Control by adding Notes & Tags in the bottom left hand corner.
- Schedule the campaign with the following elements:
- Date Range: select the date range during which the campaign will be active.
- Hour Range and Timezone: define a time range for triggered campaign delivery. This is extremely useful when you want to, for instance, activate a promotion popup only between 10 am to 12 pm.
- Recurrence: define how often this campaign will run
- Frequency Cap: select the maximum number of times a single customer should receive this campaign within your chosen timeframe. In the example below, a customer can only receive the campaign once a day. Read here to learn when to use the Frequency Cap.
- You can also choose for the maximum number of times a customer can receive a campaign while it is active, as shown below
Frequency Cap vs Duplicated Events
When to use the Frequency Cap
The frequency cap defines how many times the customer should receive the campaign, despite how many times they performed the action that meets a Trigger.
For example, let’s say the customer made a Page Visit 4 times in one day, once every hour. If you’ve set the frequency cap to trigger the campaign once every 24 hours, the customer will only receive the campaign once.
Resolving Duplicated Events
When collecting real-time customer data, sometimes a single event is sent to Optimove multiple times even though a customer carried out the specific action once. This can lead to campaigns being triggered multiple times.
To prevent this, Optimove will identify all events that consist of the same real-time data and are tracked within a 5-second period* as a duplicated event. These duplicate events will trigger a campaign only once.
*Note: To configure this time period of tracking duplicated events, reach out to Optimove Support.
Let’s say a campaign is triggered by a Page Visit event. Given there is no frequency cap, the campaign will be triggered every time a customer visits a specific page in your website unless the event is considered duplicated.
For example:
- ‘Page Visit 2’ did not trigger the campaign, as it was recorded 2 seconds after ‘Page Visit 1’.
- ‘Page Visit 3’ did not trigger the campaign, as it was recorded 5 seconds after ‘Page Visit 1’.
- ‘Page Visit 4’ did trigger the campaign, as it was recorded 6 seconds after the last event that triggered a campaign (Page Visit 1) and therefore is not a duplicated event
| Events Tracked | Time of Customer Activity | Customer received the campaign | Duplicated Event |
| Page Visit 1 | 13:10:02 | Yes | No |
| Page Visit 2 | 13:10:04 | No | Yes (of Page Visit 1) |
| Page Visit 3 | 13:10:05 | No | Yes (of Page Visit 1) |
| Page Visit 4 | 13:10:08 | Yes | No |
4. Define the execution details with the following elements
- Select the execution channel(s) and template(s) that this campaign will use
- Utilize the multi-template functionality to send different templates based on parameters that are received through real-time events, as part of the same campaign.
- Use the “Delay Execution” option to delay the campaign execution, even if a trigger was triggered.
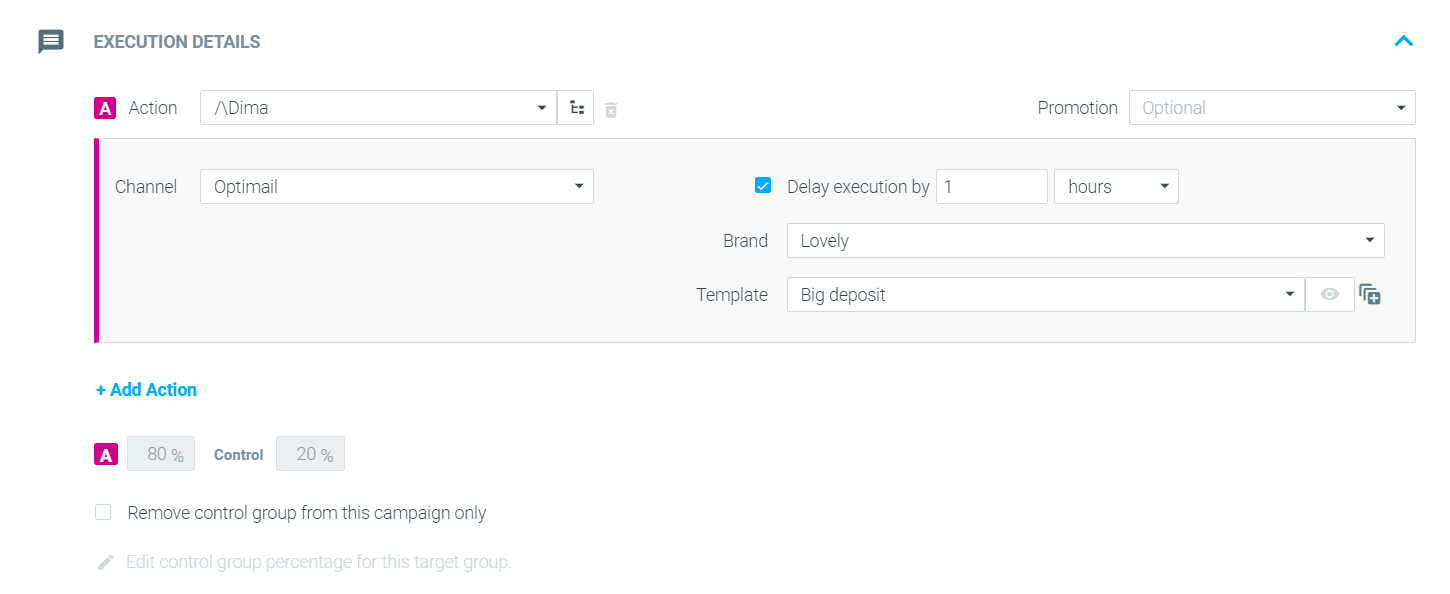
|| Note that the measured KPI and control group percentage selected for the target group will automatically apply to this triggered campaign.
You can change these values, but, as mentioned above, changes made to the measured KPI and control group percentage will apply to all existing triggered campaigns defined for this target group.
There are two further options you may select:
Run the triggered campaign without a control group – In some cases, you may want to run a specific triggered campaign without using a control group (for example, when showing a welcome message with a birthday offer).In these cases, you can select the “Remove control” checkbox to override the default control group percentage defined for the target group. Other triggered campaigns defined for this target group will still use the default control group percentage defined for the group.
Delaying the appearance of triggered webpage pop-ups – When defining campaigns that use the Webpage Pop-up execution channel, you can configure an execution delay of a few seconds (e.g., a 10-second delay). This delay is applied once a visitor to your website activates the relevant trigger so that the actual pop-up will only be displayed x seconds later. This is especially relevant when configuring pop-up campaigns to be fired upon page visits, enabling you to provide your website visitors with the best possible experience.